If you can breeze through open E, A, and D but still tense up when a song asks for the bluesy dominant built on B, you are not alone. That shape exposes sloppy fretting, awkward wrist angles, and loose right-hand control. The good news: with a clear plan, you can get it ringing cleanly in days, not months. You will see how it is constructed, how to fret it without pain, how to fix the most common buzzes, and how to use it musically. Guitarists often write this chord as B7, but we will focus on the sound and technique, not just the symbol.
What this chord does in music
Harmonically, it is a dominant seventh built on B. The notes are B (root), D# (major third), F# (perfect fifth), and A (minor seventh). That last note creates the tension. In most progressions it wants to resolve down a fifth to an E chord. In the key of E, this is the V7, which is why you hear it constantly in blues, folk, and country. Understand that pull toward E and your strumming will feel more intentional, not like you are just surviving a tricky grip.
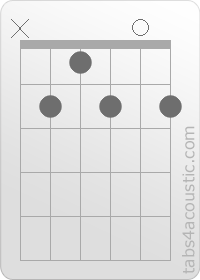
The dependable open-shape fingering
Use this left-hand layout from the thickest to thinnest string:
- Low E: do not play (mute with the tip of the middle finger or avoid with the pick)
- A string, 2nd fret: middle finger
- D string, 1st fret: index finger
- G string, 2nd fret: ring finger
- B string: open
- High E, 2nd fret: pinky
Two micro-adjustments make a huge difference:
- Let the index finger stand tall so its pad does not collapse into the neighboring B string.
- Angle the hand slightly toward the headstock so the pinky can reach the high E fret without flattening.
Set up your body first
Bad posture turns this chord into a finger-twister. Sit with the guitar neck tipped up a little, not parallel to the floor. Keep the left thumb roughly behind the middle of the neck, not over the top. Your wrist should be neutral with a small bend, not sharply kinked. If you feel strain, slide the elbow a touch closer to your ribs; that tiny change opens space for the pinky.
Fix the three most common noises
- Muted B string: your index finger is probably leaning flat. Curl it and press with the fingertip. Check that the ring finger on the G string is not touching the B string.
- Buzzing high E: push the pinky closer to the fret wire and support it by squeezing lightly with the thumb. Do not over-squeeze; overpressure sharpens the note.
- Unwanted low E: rest the tip of the middle finger against the low E string while fretting the A string. This passive mute lets you strum without surgical accuracy.
Transition drills that actually work
Progress lives in the switches, not in holding the shape for 60 seconds. Try these short, repeatable drills with a metronome at a slow click:
- E major to the dominant on B: both shapes share the second fret on the A string under your middle finger. Use it as a pivot and keep it planted while the other fingers relocate. Strum once per click for eight bars, then twice per click. Stay relaxed.
- A major to the dominant on B: slide the ring finger from A’s D string second fret up to the G string second fret for the target shape. The motion is tiny; watch it in a mirror to trim extra travel.
- Two-fret shift drill: fret the target shape, release pressure 50 percent (do not lift), then re-press. This teaches consistent finger spacing and kills the habit of lifting too high between chords.
Rhythm: give it a blues engine
Strumming makes or breaks this chord. A light shuffle works wonders: count triplets as 1‑trip‑let, 2‑trip‑let, accenting the 1 and the let. Use a downstroke on the beat and a relaxed upstroke on the let, keeping the middle trip syllable ghosted. In a 12‑bar in E, bars 9 and 12 often belong to the dominant on B. Feel the pull back to E rather than rushing the change. Aim for tone consistency across the four top strings and keep dynamics under control so the open B string does not jump out.
Compact voicings when the full shape is too much
Open chords are great, but partial shapes are often cleaner on a busy arrangement:
- Shell voicing on D‑G‑B strings: 1‑2‑0 (counting frets from the nut). You get the third, the flat seventh, and the root. It sits perfectly under a singer.
- Moveable A7‑style grip at the 2nd fret: x‑2‑4‑2‑4‑2 with a light barre across the top two strings. This gives you a punchier, mid‑focused sound; use it when the band is loud.
- Moveable E7‑style at the 7th fret: 7‑9‑7‑8‑7‑7. It is the same flavor one octave higher, great for call‑and‑response with another guitarist.
Right‑hand clarity
Strum a narrow arc that targets A through high E. Hold the pick with a shallow angle so it glides, not digs. For arpeggios, try a simple pattern: A‑D‑G‑B‑high E‑B‑G‑D. Start slow, then add a light swing. If the low string creeps in, the left‑hand mute will save the take.
Watch a quick demonstration
Sometimes seeing the hand shape beats a paragraph of text. Here is a short video you can follow along with. Pause and copy the micro‑movements, especially how the pinky lands straight down and leaves straight up.
A 10‑minute routine that builds real skill
- Minute 1: silent fretting. Place all fingers, remove, repeat. No strumming. Train accuracy first.
- Minute 2: slow rasgueado test. Strum each string separately and fix any dead notes before moving on.
- Minutes 3‑4: E major to the dominant on B, one strum per click at 50 bpm. Keep the middle finger anchored.
- Minutes 5‑6: add the shuffle feel, two strums per click. Keep the right hand loose.
- Minute 7: shell voicing practice on D‑G‑B strings. Aim for even volume across the three notes.
- Minute 8: moveable E7‑style at the 7th fret, then back to the open form. Listen for the same character, just a different register.
- Minute 9: mute control. Strum broadly while muting the low E with the left hand and any unused strings with the right palm.
- Minute 10: musical loop. Play two bars of E, two bars of A, two bars of E, one bar of the dominant on B, one bar of A, one bar of E, and finish on the dominant before the turnaround. Keep it flowing.
When the shape finally clicks
You will feel it first in your hand: less squeeze, more precision, and a bright ring from the open B string. You will also hear it in songs where that dominant moment used to derailing the groove. Keep the posture cues, the middle‑finger pivot, and the light left‑hand mute in your toolkit. With those in place, this once‑intimidating chord becomes a reliable color you will reach for in blues, folk, and even pop progressions.
Takeaway: isolate the fingering, use shared‑finger pivots for transitions, practice a shuffle rhythm, and rotate in compact voicings when the full grip fatigues your hand. In a week of short, focused sessions, you will not be avoiding the change anymore—you will be leaning into it.